
Free Lifetime SSL with Hostyap: Secure Your Website at No Extra Cost
In today’s online world, website security is non‑negotiable. An SSL certificate encrypts the connection between your visitors’ browsers and your server, protecting sensitive data and building trust. At Hostyap, we believe security should be accessible to everyone. That’s why we offer free SSL certificates for life as long as your account remains active with us.
Our SSL certificates are powered by Let’s Encrypt, a trusted, automated certificate authority. Each certificate has a 90‑day validity, but we handle the automatic renewal—so you never have to worry about expiration or manual intervention.
Why Your Website Needs SSL
- Data encryption: Protects login credentials, personal details, and payment information.
- Trust & credibility: Visitors see a padlock icon in the address bar, reassuring them that your site is safe.
- SEO boost: Search engines like Google give preference to HTTPS‑enabled websites.
- Browser compatibility: Modern browsers flag HTTP sites as “not secure,” which can drive visitors away.
With Hostyap’s free SSL, you get all these benefits without any additional cost.
Prerequisites Before Installing SSL
Before you install an SSL certificate, please ensure the following:
- Your domain’s DNS points to Hostyap’s server IP.
If your domain is not correctly pointed (or if you use external DNS like Cloudflare), the SSL issuance may fail. If you need help verifying DNS settings, contact our support team. - You have access to your Hostyap cPanel.
The SSL installation is performed inside cPanel. If you’ve forgotten your login details, you can retrieve them from your welcome email or open a support ticket.
Step-by-Step: Install Your Free SSL via cPanel
Follow these simple steps to install an SSL certificate on your domain.
1. Log in to cPanel
Access your Hostyap cPanel by visiting:https://yourdomain.com/cpanel (replace with your actual domain)
or use the login link provided in your welcome email.
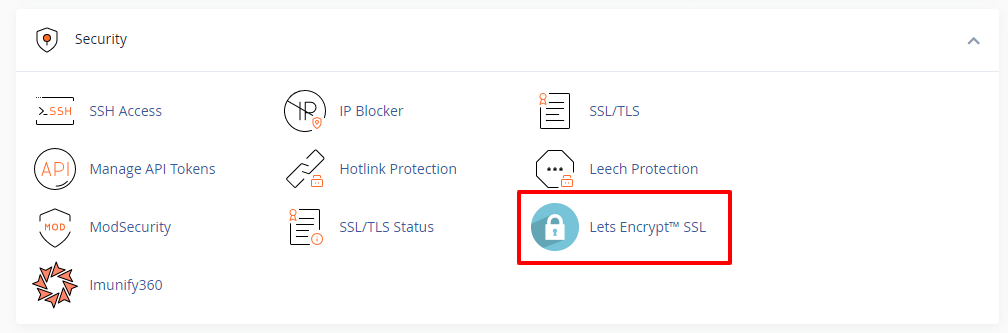
2. Locate the “Let’s Encrypt SSL” Tool
In the Security section of cPanel, click on “Let’s Encrypt SSL”.
This tool manages the free SSL certificates for all domains and subdomains on your account.
3. Issue a Certificate for Your Domain
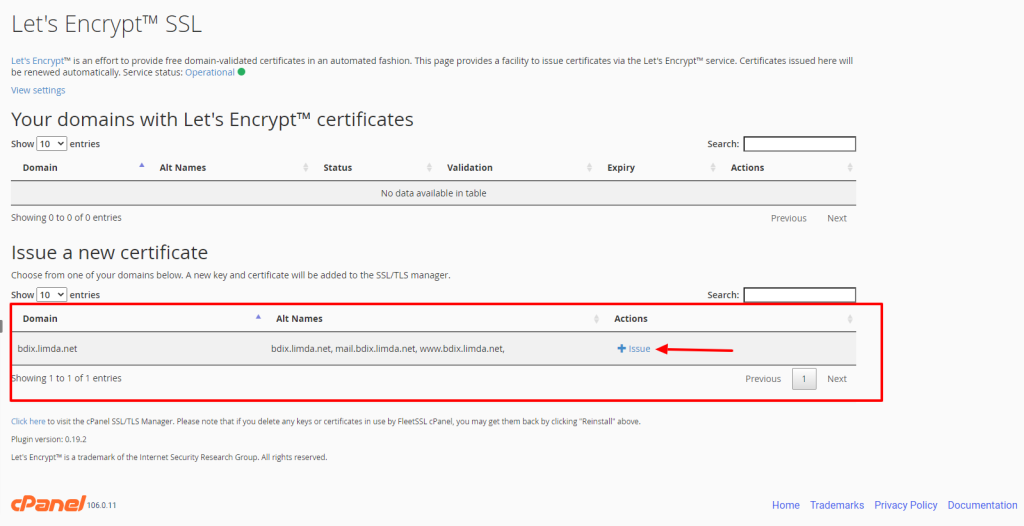
You will see a list of domains and subdomains that are eligible for SSL.
- Click the “Issue” button next to the domain you want to secure.
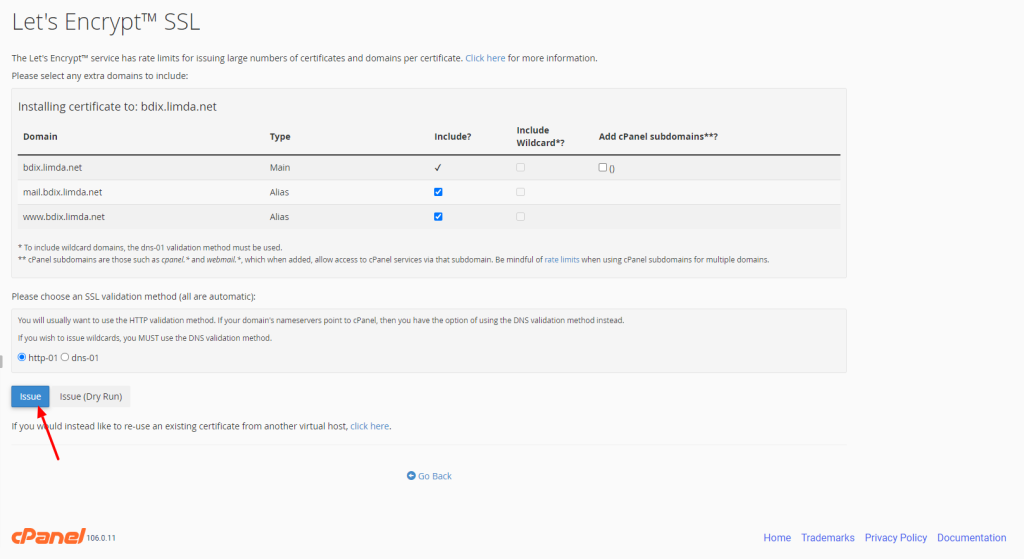
- A confirmation screen will appear—review the domain(s) to be included and then click “Issue” again to start the process.
4. Wait for the Installation
The SSL certificate is typically issued and installed within a few minutes. Once completed, a success message will appear in cPanel confirming the installation.
5. Verify the Certificate
Open your browser and visit your website using https:// (e.g., https://yourdomain.com).
You should see the padlock icon in the address bar, indicating a secure connection.
Tip: If the padlock does not appear, try clearing your browser cache or check the site in a private/incognito window.
Post-Installation: What to Do Next
Installing the SSL is only the first step. To ensure your website is fully secure, we recommend article [Click here]
Was this article helpful?